Ledergoller

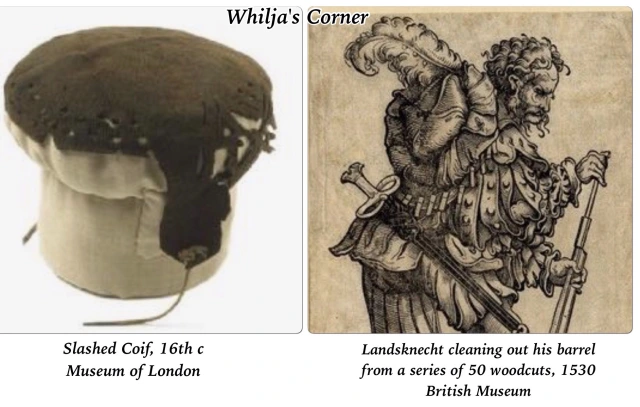
A vest probabaly made out of leather to protect the clothes, commonly seen in Landsknecht woodcuts.

The pattern based on the two above woodcuts; Front and back (note that the back mid seam is against a folded edge), the measuments are calculated for an XL Male.


Sources;

Britishmuseum.org

The Trossfrau Sock II

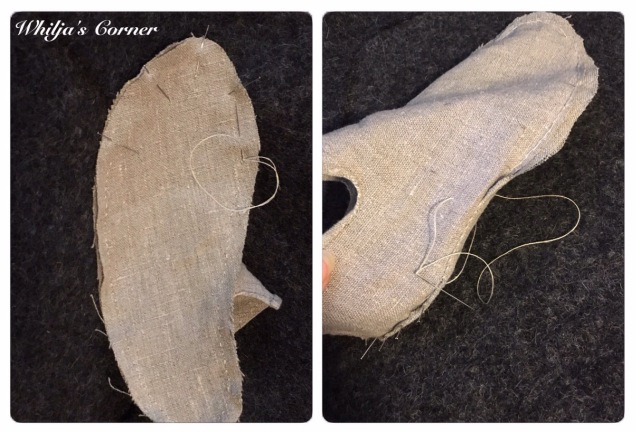
After I made my first pair of socks (read more here), a friend posted pictures of a a pair of short linen socks found at Regensburg Historisches Museum in Germany. The design on these is more simple then my first guess, with what seems to be just two sets of pieces and I’ve finally got the chance to try it out.

1) The pattern is made about the same way as I made the first one; I taped my foot and draw the lines where I wanted the seam. I then cut it out in fabric and pinned it to my foot and adjusted it until it looked right. EDIT: I belive I over worked the pattern; the incut around the ankle can just be cut straight, the shape will come naturally when you roll the hem. (I’ll upload a new pattern example when my sewing room is unpacked after the move)


2) start by stitch the heel seam, and then fell the seam


3) I finished the edges around the opening before attach the sole


4) attach the sole and fell the seam, it’s easier to get around the heel and toe with tiny stitches


A pair took around a day to make a pair, including patterning. The sources of when and by whom it was used is a bit hard to find;

– the original is dated to 15th c, but I don’t have any information about the size of the sock so I can’t say if it’s male/female/social class etc

– There is a couple of woodcuts which shows a low cut sock off both trossfraus and peasants women, I haven’t had the opportunity to research if it was used by men as well, but it seems plausible.

– The inventory of the Swedish court in the early 16th c, mentions socks with lesser amount fabric than ordinary socks. No reference to whom it was intended for.

Sources

Petronilla of London (photograper of the original located in Regensburg Historisches Museum)

Cecilia Aneer, Skrädderi för kungligt bruk Tillverkning av kläder vid det svenska hovet ca 1600-1635, 2009

Rogg, M, Landsknechte und Reisläufer: Bilder vom Soldaten; ein stand in der Kunst des 16. jahrhunderts, 2002

How to decorate with short feathers

While working with the latest Tellerbarret and its feathers, a type of landsknecht hats seems to be covered with fluffy feathers poking almost straight out on the brim and at each top, decorated with a tip of some kind.

 
I couldn’t find any information about how to achieve the look, and started some small experiments to see what can be done to get a similar look. 

1) the feathers pokes almost perfectly straight out from the brim

– a normal wing plume top will “dip”, especially if you add a baubles on the end. 

– most feathers of “normal” length is too long, and would go too far out over the brim

Possible solution: cut the feather in desired length, use the stiff part …of course it hurts a little to cut off a perfectly good feather! But, it’s actually a good way to reuse any old broken feathers you may have (and I saved the nice fluffy feather tops to be used for later hats)

  
2) make the feathers look all round and fluffy

– one feather isn’t enough, sew at least two together

– each feather is curled to achieve maximum fluffiness 

I’ve used this technique before, read more about how-to-do or follow the quick tutorial;

 
 3) Attach the decoration
The First Book of Fashion describe one hat to be decorated with   “[…] white ostrich feathers […] augmented with gilt aiglets”. Excellent, and simple:


4) the result 

(Sorry for the potatoe quality, my iPads camera is getting a bit old nowadays)  

I’ve made two so far; don’t be tricked by the few steps involved in this tutorial, curling the vanes is what you’re going to hate the most… 2 down, 14-20 more to go before it covers the whole brim

How I made the hat
5) future changes

– I used high quality wing plumes for these sets, but since I’m cutting them in half, I wonder how it would look if I instead used ordinary feathers. The stiffer feathers might also be easier to curl ..and cheaper. Which is of course is a plus.

EDIT:

People on my Facebook page suggest the feathers to be called “frizzel/frizzle” feathers, the word “frizzle” dates back to the 16th c (Thank you W.Grant and D.Gonzales)

Sources;

Graf August Johann Breünner Enkevoerth, Jacob von Falke (edited by M. McNealy), Landsknecht Woodcuts: Kriegsvölker im Zeitalter der Landsknechte, 2013 (originally published 1883)

Rublack, Hayward and Tiramani (edited), The First Book of Fashion: the Book of Clothes of Matthäus and Veit Konrad Schwarz of Augsburg

Fabric Covered Tellerbarret

An inventory in the Textiler Hausrat mention a fabric covered straw hat, and I decided to try the technique by doing a specific kind of Tellerbarret. First book of fashion also mention hats covered in fabric, but doesn’t give any clues of what the base might be made of. Probably not all hats of this type have a strawhat base, but since it’s cheap and availble I found it suitable for a campfollower.  

  
The hat is based on Erhard Schöns “Landsknecht and Wife”, 1525-1530.

How I made the hat;

1) Take a straw hat and mark and cut of the top. Don’t worry if the hole is too big, you’re going to add a layer of fabric, which will reduce the size some, and if you planning to wear it on top of some kind of head cloth, you kind of want it to be larger than your head.

  In this case I used an old straw which was a bit damaged anyway. 

2) measure the width of the brim and double the measurement and add seam allowance, this is the width. Measure the outer circumference of the straw hat, and this is the minimum length of the fabric. My straw hat was exactly the width of my fabric, which was nice.

Tip: wool rips really easy: just snip and rip in perfectly straight lines.

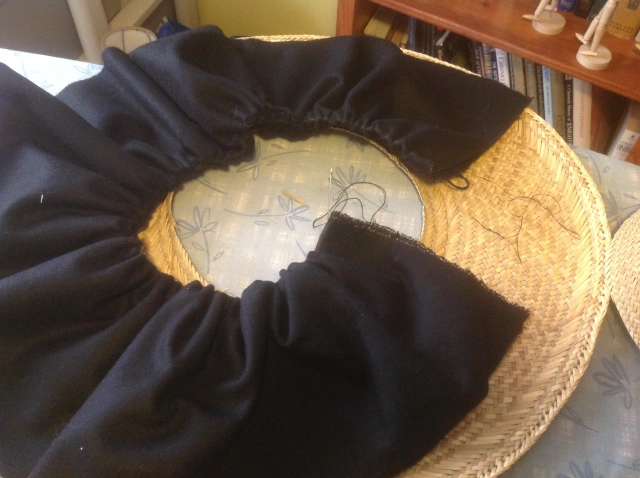
Mark the middle of the fabric and put in gatherings threads, mine is about 1/2 inch (2 cm) between. I choose to make two rows on each side of the middle, to ensure that the pleats would stay neat on both side of the brim. (Honestly, I remade my gathering threads six times before I settled for this kind. Do as you believe works best for you)

3) pull the gatherings thread carefully, you-do-not-want-them-to-brake! I used a thicker linen thread, it still broke, and I had to remake it. Fun times… Fold the fabric over the hat and place the gathered part along the inner hole. I then pulled and pinned the fabric evenly over the brim, making sure it was evenly stretched.

4) I made sure I’ve pinned all the way around on the brim and let go of the pins around the outer edge, so I could fold and whip stitched the two layers of fabric on the outer side, without loosing the even pleating. 

 
5) the inner hole with the two rows of gathering thread ended up even and nicely 

 
6) I wasn’t able to find any leeds on how the top of a fabric covered Tellerbarret would look like, so instead I study several different other models of a wide flat type of hat around the same period,  to get an idea what would be most plausible design. Here is three examples of the construction of the crown: 


A) most tops seems very flat, some looks like they are made out of a cut out round circle, some like they’ve been shaped (felt? leather?) or possibly sewn out of several pieces. The design I chose is based on the first woodcut which seems to have a curve. 

B) some hats seems to have some sort of butto- like decoration on the top.

C) I’ve noticed that a cord during this period, often seem to go through the brim and over the head.

7) a friends pattern of a hat crown seemed to be similar to the shape I was looking for; measure the base to be sure it will fill up the hole on your hat, don’t forget to take any seam allowance into the calculation. Cut out four, sew together. 

  
8) the crown is then sewn on to the brim; the edge is folded to keep it hidden. The edge is then whip stitched to the brim, which also helps keep the pleating even.


9) add cords; when you look at the woodcut, the cords seems like they goes through/attached to the brim rather then the seam between the crown and brim, so I punched a hole through all the layers and pulled my cord through it.


10) …and the hat is finished to be decorated with feathers; I am still working on how to get the same look as the woodcut, I have some ideas I’ll experiment with and publish when I’m satisfied with the result.

Amount of work hours around 8-10 hours.


Things to work on:

When studying and compare my finished hat with the woodcut, a few things might need a tweak.

– thinner cord

– smaller straw hat; the size between head and edge is smaller then mine.

– more fabric? The woodcut shows more pleats, which is also smaller. Since I made the hat out of Melton wool, I would probably need to experiment with either a thinner wool or another type of fabric.

Sources:

Zander-Siedel, Textiler Husrat: Kleidung und Haustextilien in Nürnberg Von 1500-1600. (English translation by Katerine Barich), 1990

Graf, Breünner, Jacob, Landsknecht Woodcuts: Kriegsvölker Im Zeitalter der Landsknechte (edited by M. McNealy), 2013

The first book of fashion: the book of Clothes of Matthäus and Veit Konrad Schwarz of Augsburg (Edited by Ulinka Rublack and Maria Hayward), 2015

Tece de Kaxtone, Drachenwald, http://tecedekaxtone.livejournal.com

Bling, Beads and Curly Feathers

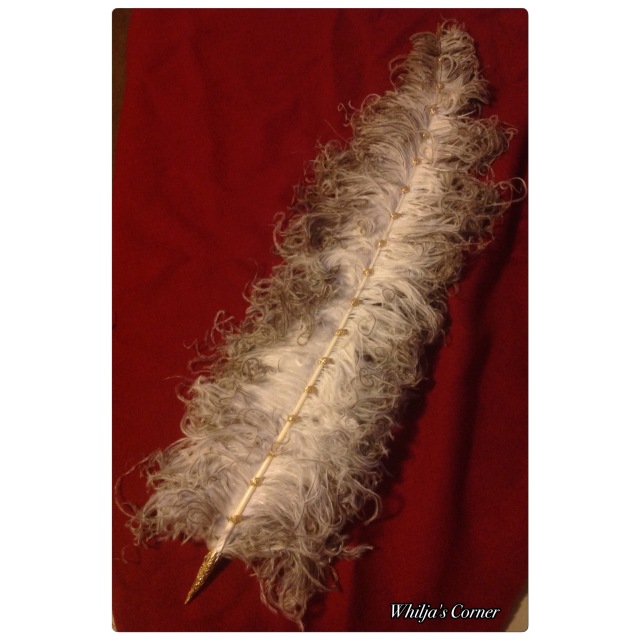
A friend asked me to make her a feather for her Elevation outfit and this is the end result;  

  
It contains no less then 3 ostrich feathers, each hand curled, stitched together and decorated with filigree decoration on both ends and along the stem. 

Decorated feathers seems to be used around the 16th century throughout Europe and even some woodcuts shows decorated feathers on Landsknechts.

  
How to make really fluffy feathers

Pick similar coloured feathers, I’ll recommend to start with just two, it is kind of tricky to wrap them as it is. 

During the last two years of selling ostriches feathers at events, I have had the opportunity to select and save the whitest non dyed feathers in the stock, initially to be used for a Saxon hat, so I had a couple to choose from for this project instead.

1) Use a sharp knife and curl each vane, kind of like you curl gift ribbon. Be careful so you don’t rip them off (it’s not the end of the world if you damage a couple, the curls will cover you)


2) When you’re done with the curls, you want to attach them; sometimes the end of the stem is a bit thick and needs to be shaved off a bit. Use a sharp knif and be careful to not slip. Removing part of the end stem will make your feathers lay more flat to each other, and will give you a thinner end, which will fit into the aiglet easier in the end.


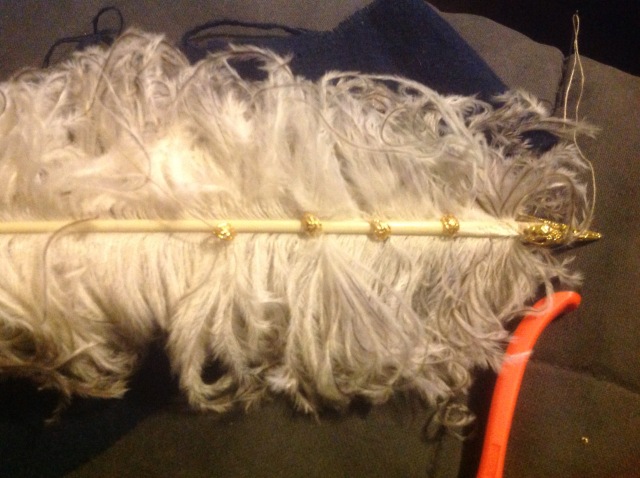
3) Attach the feathers. A natural linen thread blends nicely with the colour of the stem. Wrap it carefully around both feathers. If a vane get caught, use a needle to carefully pull it out. Don’t stress this part, take your time to wrap it even around the stem.

 
(From an old project;  the linen thread is visible from the underside, some stray vanes is pulled out with a needle)


4) If you want to add beads, the just add them along the way while you wrap the thread. It’s a pain in the butt to wrap and bead at the same time, so may skip this part for your first time binding feathers together. 

  
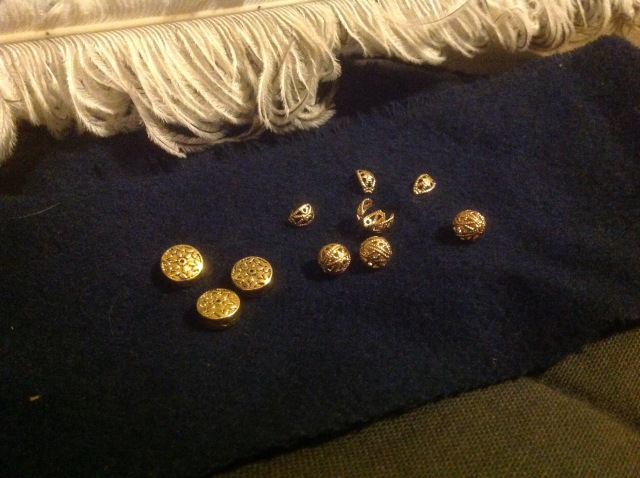
The decoration used for this feather is actually a cut open filigree bead; it was light and the slight curve made it easy to use on the stem without it sliding around on the rounded surface. 


To the left, the beads specially bought for the project was not right, they was too heavy and slightly curved and wouldn’t lay flat to the stem. To the right, the filigree bead in its different stages of being cut up. 
5) I wanted to add all the bling! to the feathers, and used two filigree aiglets on each end.


Pretty neat right? Took around 10-12 hours to make, give and take all the mistakes and changes I did during the project.

Sources;

Few techniques to add Turban ornaments

Mistress Juliana of Caid

Master Roland of Atenveldt

Nationalmuseum, Sweden

British Museum, England

Museo Nacional del Prado, Spain

How to keep the hat on your head

1) Lets tie this hat to the head 

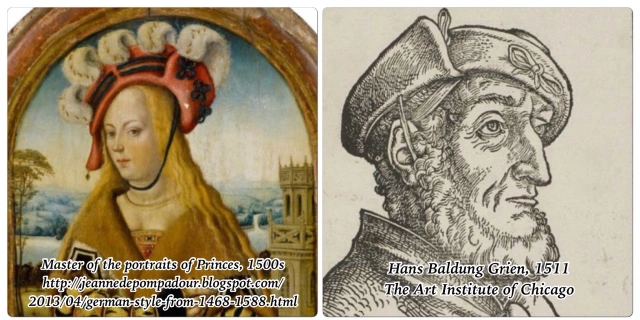
The Graf woodcut shows some kind of cord thread through the brim and tied on top of the head and the woodcuts also shows the same construction on both men and women. (Swiss)

The Coloured woodcut shows a man with a similar construction, this time with the cord (which looks like it’s simply a piece of fabric) wrapped around the hat to keep it from fall off. (Swiss?)

And isn’t it pretty cool to see an extant piece of a very specific construction? The last pictures is a British hat made out of leather where the cord goes through the brim and it has also a little cut out, presumably to add a feather as the reconstruction shows. (Maybe they should have tied the cord on the head, though?) (British) 

  
This technique seems to have been used by Landsknechts as well. The first Woodcut may even show a slight,y different approach where the band might not really go through the brim, instead pulls throug the split of the brim (bonus detail; is it buttons, pins or the top part of a pulled through cord that is visible on the brim?) (Germany)


2) The stitched on cord 

The left picture shows a coif with the cord sewn on to the ear flap. (British)

The right woodcut shows a hat presumably hanging around his neck via a cord but without any sign of a cord that runs across the crown; It might be a construction similar to the coif, with a sewn on cord. (German)


3) The cord through the brim flap


Here the brim has been cut and that piece is folded down. The cord is attached either through a punched hole or sewn to the flap. (Swiss)


4) The cord through the folded brim

 Maybe this cord is attached according to the same principles as example number 1 …or maybe the cord just goes through the brim and hides behind the fold around the crown, or its part of the cord seen on the brim? At least we can say that this type of hat also can be equipped with a cord. (Germany)


5) Tied behind the neck

 
Maybe, maybe not; but doesn’t it kind of look like she has a bow on top of her head? If that’s the case, then the hat is probably tied around the neck since there isn’t anything visable under he chin. (Swiss?)
6) That special snowflake

 
I love it!

___________________________________________

Links; 

V&A’s Collection

Kunstmuseum Basel

British Museum

Museum of London

The Art Institute of Chicago

Museum Boijman Van Beuningen

Kupferstichkabinett 

http://jeannedepompadour.blogspot.com

A Swiss dress from the 16th century

IMG_1610 (Urs Graf 1517

Since the whole dress on my woodcut isn’t really visible and doesn’t provide any specific details, I collected woodcuts made by Urs Graf, and sorted them into chronological order to better get an idea of the evolution of a Swiss dress from around 1500 and up to around ten years after the woodcut I based my sleeve on.

IMG_2553

IMG_2554-0

IMG_2556-0

IMG_2557-0

The woodcuts aren’t that precise and it’s tricky to figure out if the details just might be left out, or if it’s really part of the construction, though they still gives you some ideas of how to assemble the construction of the dress;

– the neck line is rounded and very low cut both in the front and back.
– some necklines is even so low cut that they goes underneath the bust.
– the shoulders is very far out on, sometimes not even on the shoulders (which also also be a bit exaggerated by the artist since some woodcuts also shows the naked bosom)
– the skirt is very full, but doesn’t have that much of fabric around the waistline, which indicates a triangular cut.
– the skirt seems to be gathered in different ways around the waistline; some is gathered more in the front and back, and others seem to have an evenly distributed gathering around the waistline
– the skirt is usually depicted long with a train, sometimes it’s hoisted up as very common among the woodcuts of German Camfollowers
– it seems more common with just a plain skirt, even though some of them have one or several guards along the bottom part of the skirt
– front opening seem to be common, and some woodcuts even shows a large opening in the front of the skirt.
– slashing around the neckline seems to not be common even though it exists

The Bodice 

I favor the four panel construction of my bodice, since it gives more control of the fabric to shape it to fit me properly, and one of the woodcuts from 1514 shows a shade in the back of her that might indicate a backseam. After I finished my bodice, I realize that the low cut back made a backseam a bit unnecessary, and since I have to move the front patterns sides backwards anyways, I will remake the swiss pattern into three pieces for the next dress since it will save me some sewing time.

The construction of the shoulders was a bit challenging; I wanted them to go very far out, but still not fall of my shoulders or hinder my movement. At this point I wished I had more time to finish a proper supportive undergarment that would take off some of the strain from the outer dress, but time is a matter, and I have to wait a little more before I get that done…

When working on the shoulder straps I become a bit suspicious that the woodcuts might be a bit exaggerated; how can you move your arms if you have a dress hanging over them? To be sure that Urs Graf’s woodcuts is actually showing a correct dress, with broad shoulders, I started to look for other Swiss paintings from this period.

IMG_2511
Detail of the Meyer Madonna by Holbein (1526-1528)

Holbeins painting of the young daughter of Meyer shows the same type of bodice with the shoulders far apart and with both front and back very low cut. This also shows the that the front isn’t covered by a guard …which I didn’t notice until a little bit to late when I made my own bodice; I didn’t payed enough attention to realize that the Swiss dress looked differently then the 16th c German dresses, and that the guard covering the front opening didn’t showed up in Switzerland until much later …some ad hoc solutions was therefore made on my own bodice because I had to fix my mistakes. Very well, lesson learned…


Since I already had sewn the hooks and eyes on the inside of the dress, I needed a solution to hide the stitches (because I didn’t wanted to remove them all and do it all over again) so I ended up hiding the stitches with a folded piece of fabric around the front edge. Next dress I’m hiding the hooks between the layers instead.


The hooks and eyes are made out of an 18 gauge silver plated bronze wire and attached on the inside with stitches through both layers of fabric.

During the last years I’ve been trying to increase the amount of documentable techniques, tools and supplies. Since I havnt found any sources of using dyed linen thread, (and the dress is supposedly based on a woodcut for a Campfollower, so silk thread isn’t an option), I use a natural linen thread. The thread is therefore hard to hide, so the focus is to just keep it as invisible as possible on the outside, while I let it be shown on the inside. 

C. Aneer in her thesis “Skrädderi för kungligt bruk” (Uppsala 2007) have a section about the quality in stitches from a variety of clothes (c 1600-1615) from the a Swedish Royal Armoury, where she reflects over the low quality of the stitches, that the clothes seem to be basically whipped together with no more care then to hold, rather than showing off an elaborate tailoring skills with high quality seams. (Underwear is a different subject; they are incredible neatly stitched together). It might seem plausible consider that outerwear probably isn’t going to be washed in the way as underwear, and therefore doesn’t need the same strong and neat seams as underwear would require.

My thread is therefore visible on the inside and I tried to use just enough stitches to ensure that the dress wouldn’t fall apart …which didn’t really worked since my muscle memory was still set for tiny stitches after the last major project “The Sture Shirt”. I did though use a larger amount of whip stitching then before and the bodice is therefore whip stitched instead of sewn with back stitches.


The fashion fabric is wipstiched from the inside, and then the lining is wipstitched. The picture also show the stitches of the inside of the arm hole, the seam is prick stitched on the outside …and due to lack of economical resources at the moment, I had to use a coloured linen i already had, to line the bodice, instead of buying a natural linen which would have been more historical accurate. That descion was a bit hard to do, but sometimes the mundane life doesn’t cooperate with your perfect ideals.

The guards on the bodice is made by a straight piece, pinned down and steamead to form around the corners in the front and back. By using the light coloured thread, I decided to let the guards fold over and then simply stitch it on the inside. The inside edge isnt folded to keep the layers of wool to a minimum.

Since the sleeves need to be attached by a cord, and i cant find any sources of possible easy-to-use solutions, i decided to simply just add three rings on the inside around the top part of the shoulder, where the corde from the sleeves easy can be slipped into and would not be noticed when i choose to wear the dress sleeveless.

 Early 16th c Swiss dresses seems to only have guards around the neckline, the back has a very distinctive round shape and the front seem to dip very low and close to the armholes. The inside of one of the shoulder straps shows one of the rings for the attachable sleeve

The skirt

This was the most interesting part because I had the opportunity to try a couple of new techniques! The woodcuts shows that all the skirt has a distinct fall that most probabl can only be achieved with some sort of triangle cut of the fabric (…rather then the rectangular tube construction I use when making German garb). When searching for input of different ways to achieve that look, I study both Mistress Ariana and Mistress Julianas half circular constructions an decided to try one of the Alcega constructions. One of the impressive works that is being done is one mans project of making mini reproductions of the Alcega patterns, and his research helped me quit a long way to easy achieve the look I was aiming for.

If you havn’t seen The Alcega Project yet, please take a moment to look at his blog, it’s a joy to read!

By this point I got a bit carried away and have unfortunately not so many picture of the process; but you can se my transfer of the original pattern on to my double folded fabric (which gives you a straight grain in the front and back) and the little interesting detail of the different sized triangles whichs helps flare out the skirt in the bottom. (The small picture shows the different in length of back and front, which I decided to keep to give the skirt a little bit of a train)


The pattern gives you two non symmetrical triangular shapes  on the side of the dress

The hem

The wool I use is light weight, so I took the opportunity to try a technique a talented friend of mine used for her latest 16th German dress (Adelheit is one of my favorite choice to discuss 16th century sewing with, I warmly recommend to visit her newly started blog) which gives a bit extra stability …and also protects the hem and makes it look a little bit like I actually have an underskirt (California, you’re a very hot lady). Different ways to add extra stability and sturdiness can be seen in extant pieces, and with the information provided by Adelheit from her tries, I gave it a try;

  
1) The brown fabric is back stitched to the edge, then folded over a piece of double folded left over heavy weight wool fabric I happen to have in my scrap stash. Small running stitches keeps the inner layer of wool in place.

2) The orange fabric is then prickstitched on the front side to keep it flat and adding some extra weight

3) The brown fabric is then folded and stitched, which can be seen some from the outside 

4) I experimented with different kind of stitches; as a Campfollower, I probably wear the skirt hoisted, which would make the seam of the hem visible. I tried both wipstitch and running stitch but instead used a hidden running stitch (to the left) which is basically hiding the thread inside the fabric

The width of the brown fabric is simply decided by the fact that I use a light weight wool which makes the final stitches very visible, so I went for just about 1 1/2″, enough to give stability, but not too wide so I kept the front side stitches close to the hem.

The Skirt Guard

There isn’t that many 16th c Swiss dresses with a decorative guard on the skirt,  but since the dress is planned to be worn with out the fancy sleeves, I wanted to add something extra to cheer it up a bit …and also challenge myself to try to add a straight piece of fabric to a curved skirt.

  The original woodcut doesn’t show the full figure, which gave me some freedom to design the rest of the look on the dress, and I decided to use this guard design because it gave me the opportunity to add both brown and an additional yellow colour.

 The reason I choose to finish the hem before adding the guard was to make sure I had an even edge to work from when marking out the path of the guard (my Smocking ruler was very handy to use).
  

The top part is pinned and stitched first, since it’s the shortest length due to the cut of the skirt …the bottom part need some stretching before its pinned, and I wanted to be sure that the top wasn’t going to move. The yellow wool is simply double folded and slipped in between the lathe here, saving me some sewing time.

  
The bottom part is then steamed and pinned in order to follow the curve of the skirt

  
Before picture of the guard before its steamed and ironed flat. The construction of the skirt with the straight front and the flares on the sides, actually made this step easier then anticipated; I basically just need to start in the front and back and pin the guard against the sides until it started to crinkle, and then I steamed the fabric between this two points to form the guards to follow the curve of the skirt. 

The yellow fabric is slipped in before I start to sew;  

When you don’t want to pin all layers together (or pin on the ironing board as I did here since I was still using the iron to flatten the guards) you can always put something hard underneath to prevent the pin to go through to many layers (I used my ruler for example)  

…then all its left is to attach the skirt to the bodice, in this case I used evenly rolled pleats (woodcut number 3), attach the inner lining to the skirt and attach the sleeves and take a picture of the dress hangin on my dress form, until I can use it for the next event! 
Woodcut 1 and 4 is the same woodcut, and shows the inspiration for the neckline and the guards. 

Woodcut number 2 is the original I used as a base for this dress project with the fancy sleeves

Woodcut number 3 shows the inspiration of the pleating technique I used.

Update: I havn’t still got the time to take a clear picture, but some of my friends have at least managed to catch me in different angles during  this past weeks; 

  
Pictures taken by B. Rudmann

German or Swiss? Landsknecht or Reisläufer?

The quick and dirty introduction of who’s who;

Until 1490 the Swiss were the superior warriors of Europe, and Swiss instructors was imported to tech German soldiers how to fight, forming a new group of mercenaries in Europe, the Landsknechts. The Landsknechts also copy the Swiss outfit and even added more slashes and flamboyant look to it.

The Landsknecht copying the Swiss fighting style and fashion wasn’t that popular among the Reisläufers and the lesser employment opportunities with a growing group of Landsknechts, made the two groups bitter rivals and enemies, especially since the Landsknecht didn’t care for who they fought for …as long as they were payed.

The woodcut below shows a rare view of a Landsknecht and a Reisläufer in the same woodcut, a symbol of a truce between the two groups during this period of wars raging back and forth through Europe.

IMG_2285

The slashing
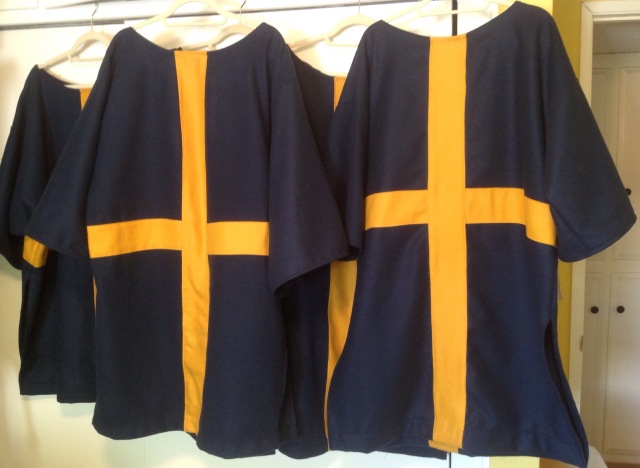
The Landsknecht on the left has the distinct x slashing on his leg popularly interpret as the representing the cross of Saint Andrew and the Holy Roman Empire (Osprey). The Reisläufer’s chest and sleeve has a + slashing representing the Swiss Confederation.

The artist
Some artist painted several different kind of mercenaries, but most of them have their favorite kind of mercenary; Urs Graf (Swiss citizen and served as a mercenary during his lifetime) is more likely to paint Reisläufers rather then Landsknechts.

The weapons
The Katzbalger was seen as the symbol for a Landsknecht. Katzbalger is the short sword seen of the left mercenary above.

The Sture Shirt Project

sture shirt Bridget photo

Photo taken by B. MacKenzie

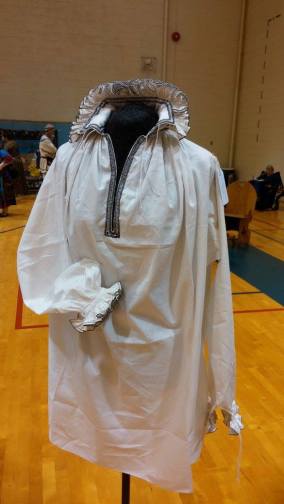
A year and a half long project of finishing an exact (give and take the adjustments to my size) replica of a shirt from 1567 is finally completed. The project has been both hated and loved, sometimes at the same time, and thought me both to try new techniques, sharpening my handsewing skills and gave me an incredible opportunity to study all the details of a almost 500 years old shirt.

IMG_2208left: photos from J. Arnold Patterns of Fashion 4
right: the recreated shirt

Background

In 1567, members of the Swedish nobility (Svante Stensson Sture, Nils Svantsson Sture, Erik Svantesson Sture, Abraham Gustafsson Stenbock and Ivar Ivarsson Liljeörn) were executed for plotting against the Swedish king, and their last worn clothing was kept by the Sture family as a relic and reminder and to ensure that this tragic part of their family history would never be forgotten. The clothes were preserved in an iron chest until 1883 when they were incorporated into the Swedish History Museum. In 1948 Anna-Maja Nylén was appointed the task of conducting a thorough investigation of the clothes, including four linen shirts, to document the present condition (Nylén p 217-218). This set of clothing is today known as Sturekläderna, the Sture Clothing.

IMG_2212IMG_2211

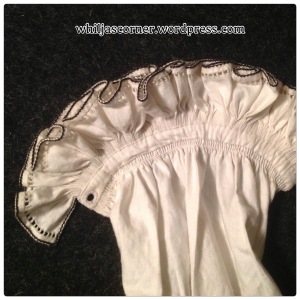
The sleeve is whip stitched to the cuffs, and the ruffles keeps in place with back stitches. The original sleeve have a lacing hole on one side and traces of a cord on the other side.

Summary

The goal is to create an exact copy of a 16th century shirt from Sweden, by using the same techniques and tools available at that time. The shirt has only three exceptions from the original shirt (since I want to be able to fit myself in it when the shirt is finished): length, neck and cuff size
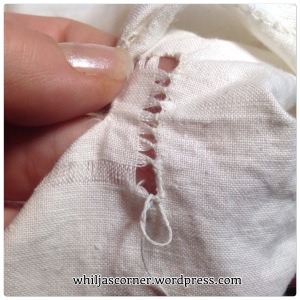
The fabric is a hand- or early 20th century machine woven, almost identical with the specific width of the original fabric used. The width of the fabric was crucial due to the specific way the shirt is constructed, with tiny whipstitch along the selvedge. The shirt is sewn with linen thread by the same kind of stitch used on the original shirt.
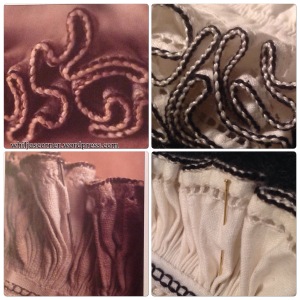
The ruffle on the collar is 498 cm long and the cuffs 249 cm long piece each. All the ruffles has a decorative drawn thread work and are also decorated on the edge with a handmade 4-ply black and white silk thread.

Download the PDF
The paper The Sture Shirt Project is free to download. This paper is also free to use in educational purpose, but please be sure to always include my name and a reference to this webpage. Honour others work and I will be happy to return the favor.

IMG_2213IMG_2209

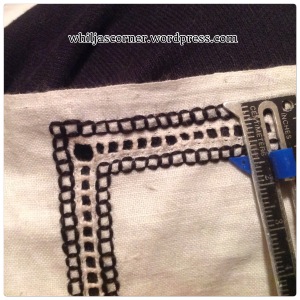
Left: Both sides of the collar, and around the front opening, there is a decorative drawn thread work and box stitches of black silk
Right: Collar and cuffs ruffle are both decorated with a drawn thread work and a black and white silk braid is whip stitched to the edge. The total length of the ruffle is around 10 meter/32 feet (5+2.5+2.5 m).

The Oscar Speech
A special thank you to Malin Berglund, Margaret Sanborn, Kevin Laurell, Mike Murphee and Adrian Sawyer for both technical advice of the terminology and the proof reading and commenting. Any fault in grammar or misspelling is completely my own and the disadvantage for not speaking English as a first langugage.

I would also thank Sarah Thaler and Margaret Sanborn for the help with making the braid, it means a lot for me that you both had the time to assist me when I was running out of time.

Amber Kay, Cynthia Konow-Brownell and Bridget MacKenzie, without your technical expertise in teaching me how to make the braid, I would never have been able to enter the competition at all.

Thank you Agnes Edgren and Lotta Ahlen for patiently listening to all my rage and worries and excitment during the process, and letting me bug you with the proud photos shoots of every single step.

And last, but not least, a thank you to my husband for all the support you given me during the process!

IMG_2214

Work in progress: the drawn thread work around the front opening