A Swiss dress from the 16th century

IMG_1610 (Urs Graf 1517

Since the whole dress on my woodcut isn’t really visible and doesn’t provide any specific details, I collected woodcuts made by Urs Graf, and sorted them into chronological order to better get an idea of the evolution of a Swiss dress from around 1500 and up to around ten years after the woodcut I based my sleeve on.

IMG_2553

IMG_2554-0

IMG_2556-0

IMG_2557-0

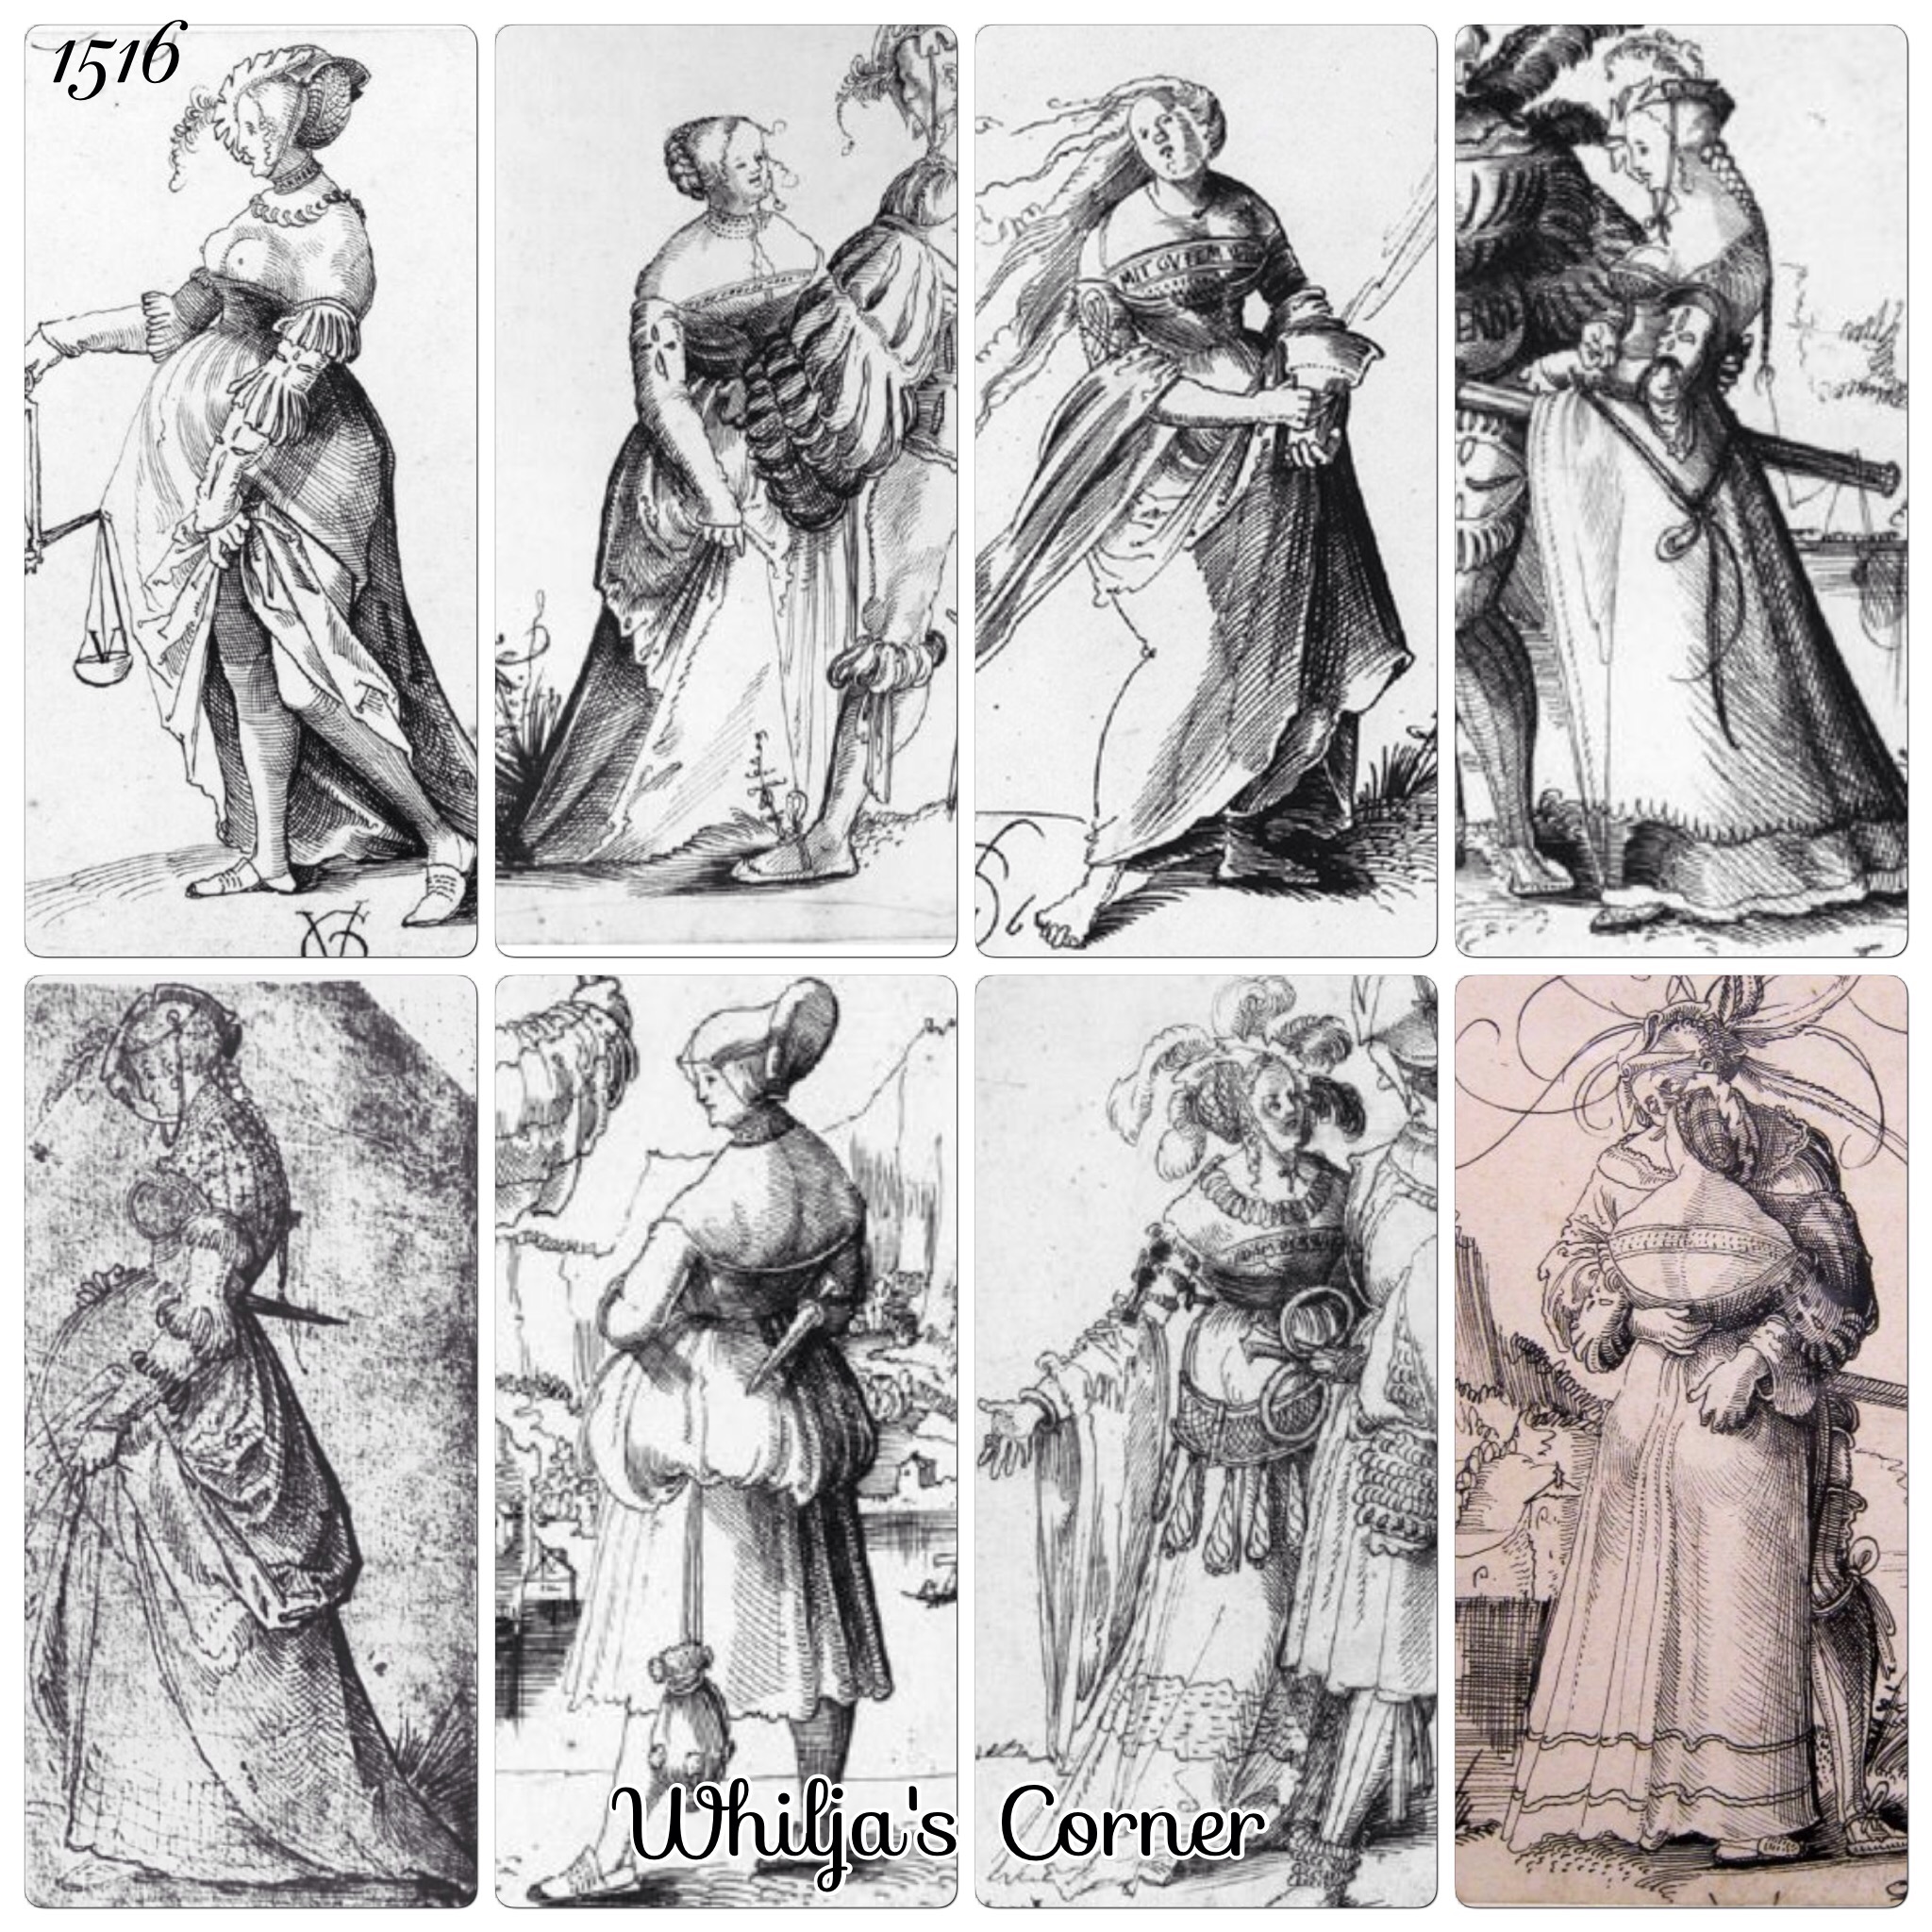
The woodcuts aren’t that precise and it’s tricky to figure out if the details just might be left out, or if it’s really part of the construction, though they still gives you some ideas of how to assemble the construction of the dress;

– the neck line is rounded and very low cut both in the front and back.
– some necklines is even so low cut that they goes underneath the bust.
– the shoulders is very far out on, sometimes not even on the shoulders (which also also be a bit exaggerated by the artist since some woodcuts also shows the naked bosom)
– the skirt is very full, but doesn’t have that much of fabric around the waistline, which indicates a triangular cut.
– the skirt seems to be gathered in different ways around the waistline; some is gathered more in the front and back, and others seem to have an evenly distributed gathering around the waistline
– the skirt is usually depicted long with a train, sometimes it’s hoisted up as very common among the woodcuts of German Camfollowers
– it seems more common with just a plain skirt, even though some of them have one or several guards along the bottom part of the skirt
– front opening seem to be common, and some woodcuts even shows a large opening in the front of the skirt.
– slashing around the neckline seems to not be common even though it exists
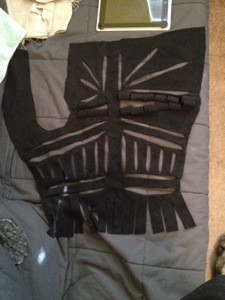
The Bodice 

I favor the four panel construction of my bodice, since it gives more control of the fabric to shape it to fit me properly, and one of the woodcuts from 1514 shows a shade in the back of her that might indicate a backseam. After I finished my bodice, I realize that the low cut back made a backseam a bit unnecessary, and since I have to move the front patterns sides backwards anyways, I will remake the swiss pattern into three pieces for the next dress since it will save me some sewing time.

The construction of the shoulders was a bit challenging; I wanted them to go very far out, but still not fall of my shoulders or hinder my movement. At this point I wished I had more time to finish a proper supportive undergarment that would take off some of the strain from the outer dress, but time is a matter, and I have to wait a little more before I get that done…

When working on the shoulder straps I become a bit suspicious that the woodcuts might be a bit exaggerated; how can you move your arms if you have a dress hanging over them? To be sure that Urs Graf’s woodcuts is actually showing a correct dress, with broad shoulders, I started to look for other Swiss paintings from this period.

IMG_2511
Detail of the Meyer Madonna by Holbein (1526-1528)

Holbeins painting of the young daughter of Meyer shows the same type of bodice with the shoulders far apart and with both front and back very low cut. This also shows the that the front isn’t covered by a guard …which I didn’t notice until a little bit to late when I made my own bodice; I didn’t payed enough attention to realize that the Swiss dress looked differently then the 16th c German dresses, and that the guard covering the front opening didn’t showed up in Switzerland until much later …some ad hoc solutions was therefore made on my own bodice because I had to fix my mistakes. Very well, lesson learned…


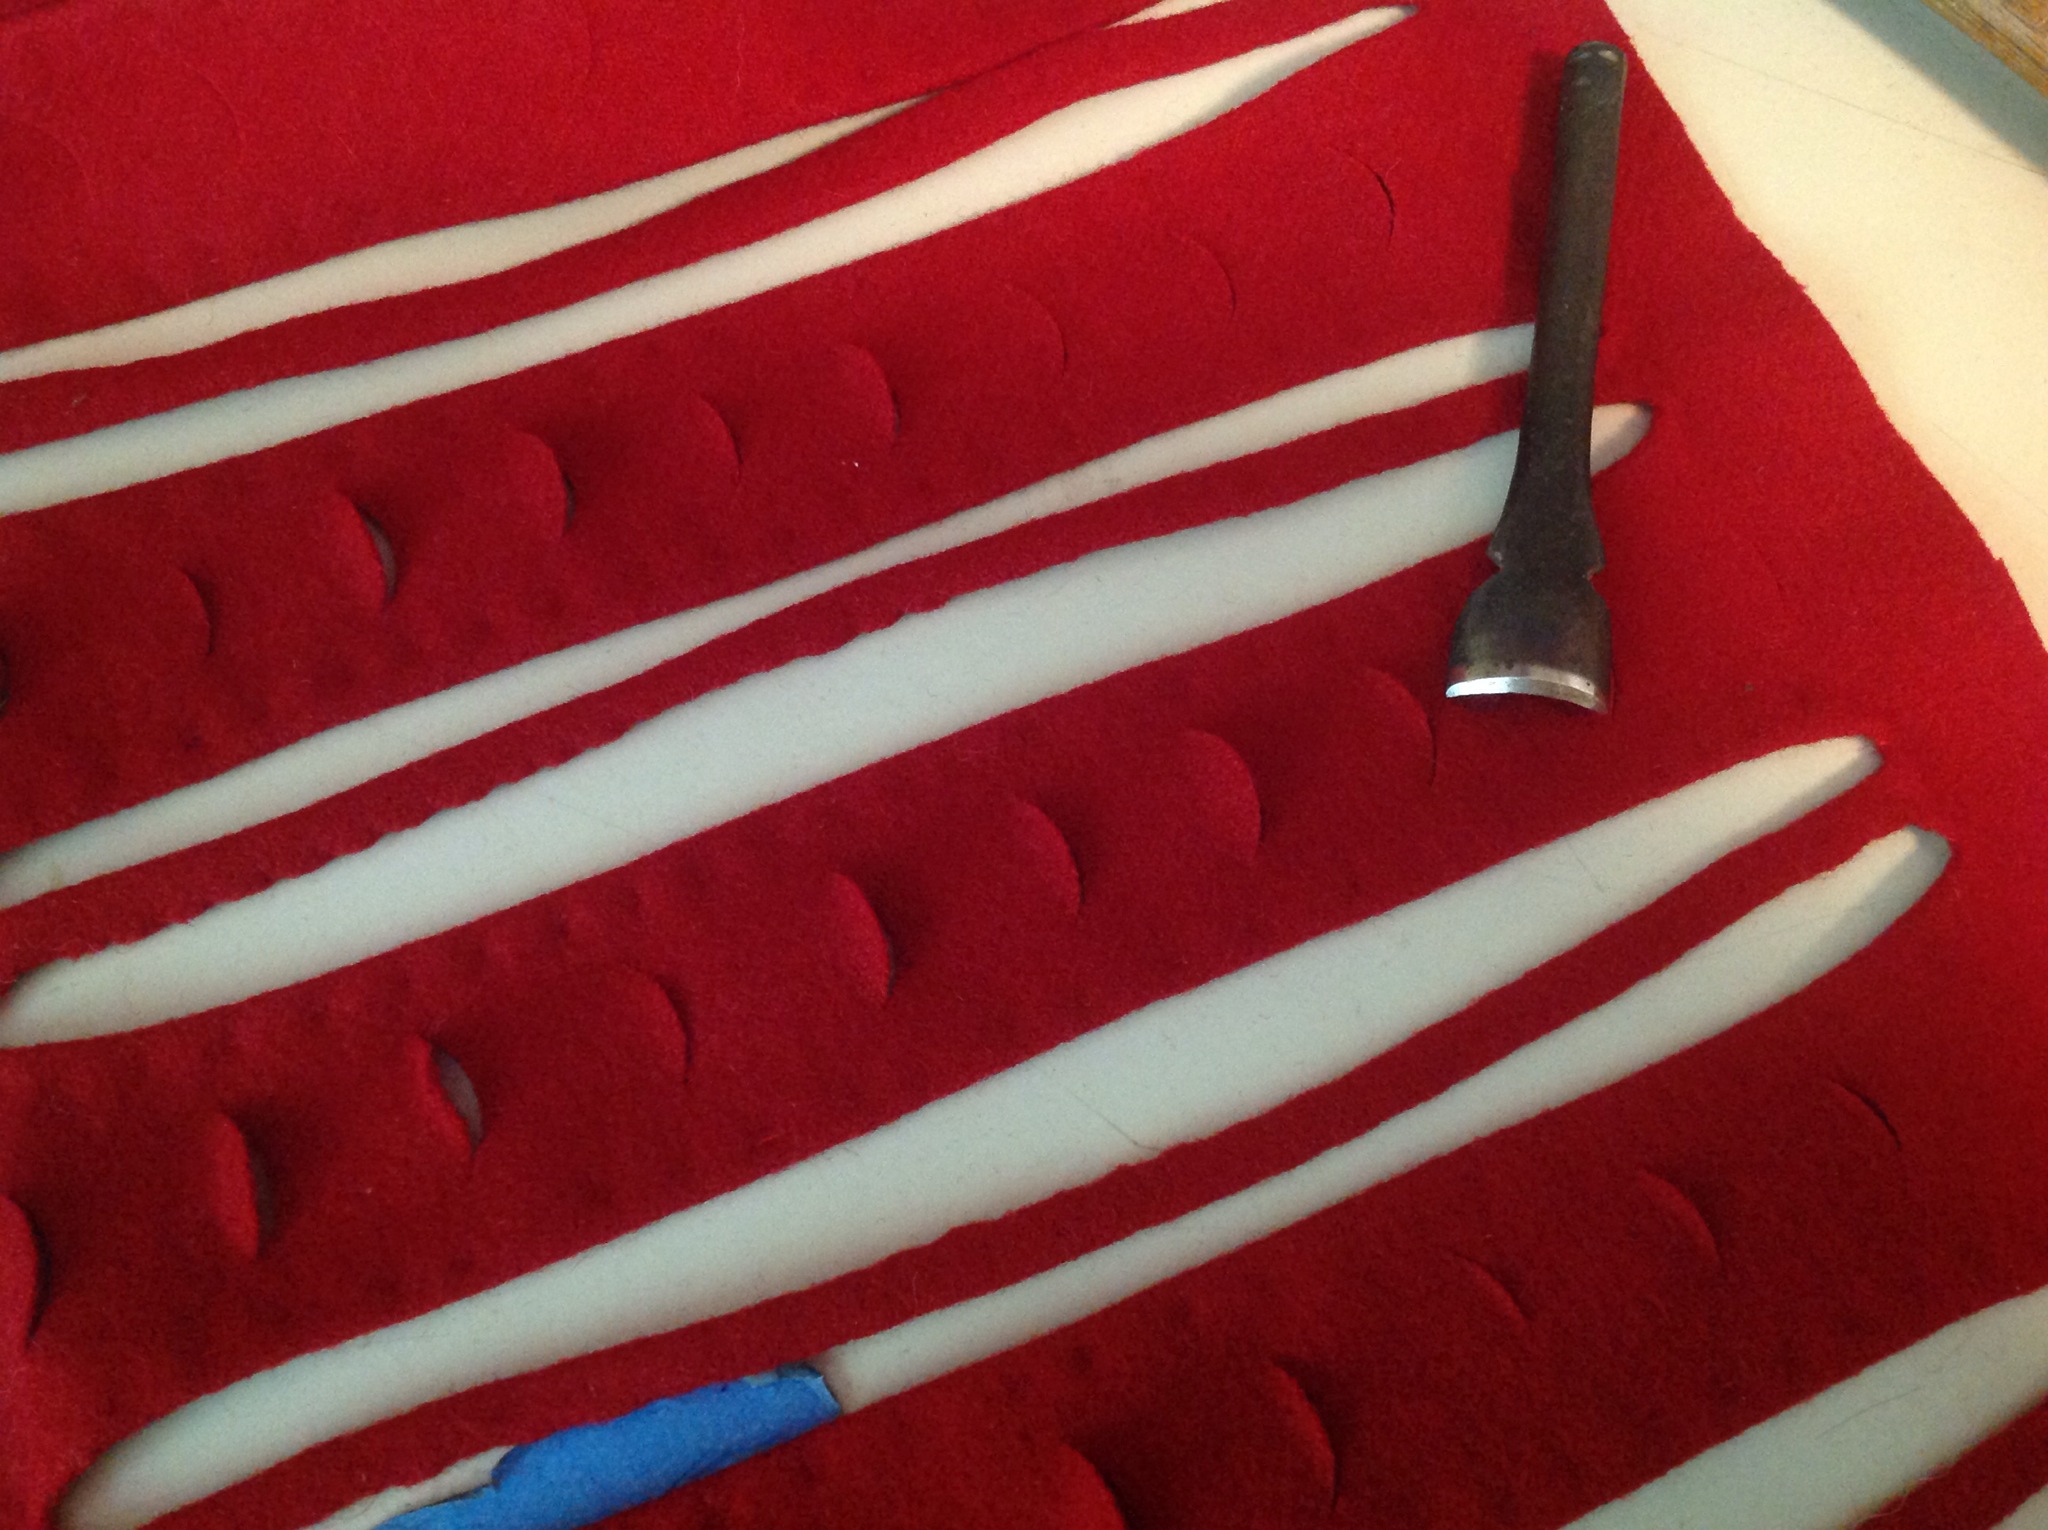
Since I already had sewn the hooks and eyes on the inside of the dress, I needed a solution to hide the stitches (because I didn’t wanted to remove them all and do it all over again) so I ended up hiding the stitches with a folded piece of fabric around the front edge. Next dress I’m hiding the hooks between the layers instead.


The hooks and eyes are made out of an 18 gauge silver plated bronze wire and attached on the inside with stitches through both layers of fabric.

During the last years I’ve been trying to increase the amount of documentable techniques, tools and supplies. Since I havnt found any sources of using dyed linen thread, (and the dress is supposedly based on a woodcut for a Campfollower, so silk thread isn’t an option), I use a natural linen thread. The thread is therefore hard to hide, so the focus is to just keep it as invisible as possible on the outside, while I let it be shown on the inside. 

C. Aneer in her thesis “Skrädderi för kungligt bruk” (Uppsala 2007) have a section about the quality in stitches from a variety of clothes (c 1600-1615) from the a Swedish Royal Armoury, where she reflects over the low quality of the stitches, that the clothes seem to be basically whipped together with no more care then to hold, rather than showing off an elaborate tailoring skills with high quality seams. (Underwear is a different subject; they are incredible neatly stitched together). It might seem plausible consider that outerwear probably isn’t going to be washed in the way as underwear, and therefore doesn’t need the same strong and neat seams as underwear would require.

My thread is therefore visible on the inside and I tried to use just enough stitches to ensure that the dress wouldn’t fall apart …which didn’t really worked since my muscle memory was still set for tiny stitches after the last major project “The Sture Shirt”. I did though use a larger amount of whip stitching then before and the bodice is therefore whip stitched instead of sewn with back stitches.


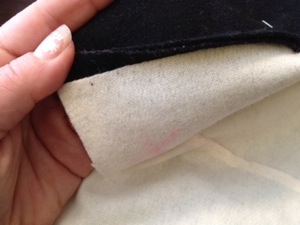
The fashion fabric is wipstiched from the inside, and then the lining is wipstitched. The picture also show the stitches of the inside of the arm hole, the seam is prick stitched on the outside …and due to lack of economical resources at the moment, I had to use a coloured linen i already had, to line the bodice, instead of buying a natural linen which would have been more historical accurate. That descion was a bit hard to do, but sometimes the mundane life doesn’t cooperate with your perfect ideals.

The guards on the bodice is made by a straight piece, pinned down and steamead to form around the corners in the front and back. By using the light coloured thread, I decided to let the guards fold over and then simply stitch it on the inside. The inside edge isnt folded to keep the layers of wool to a minimum.

Since the sleeves need to be attached by a cord, and i cant find any sources of possible easy-to-use solutions, i decided to simply just add three rings on the inside around the top part of the shoulder, where the corde from the sleeves easy can be slipped into and would not be noticed when i choose to wear the dress sleeveless.

 Early 16th c Swiss dresses seems to only have guards around the neckline, the back has a very distinctive round shape and the front seem to dip very low and close to the armholes. The inside of one of the shoulder straps shows one of the rings for the attachable sleeve

The skirt

This was the most interesting part because I had the opportunity to try a couple of new techniques! The woodcuts shows that all the skirt has a distinct fall that most probabl can only be achieved with some sort of triangle cut of the fabric (…rather then the rectangular tube construction I use when making German garb). When searching for input of different ways to achieve that look, I study both Mistress Ariana and Mistress Julianas half circular constructions an decided to try one of the Alcega constructions. One of the impressive works that is being done is one mans project of making mini reproductions of the Alcega patterns, and his research helped me quit a long way to easy achieve the look I was aiming for.

If you havn’t seen The Alcega Project yet, please take a moment to look at his blog, it’s a joy to read!

By this point I got a bit carried away and have unfortunately not so many picture of the process; but you can se my transfer of the original pattern on to my double folded fabric (which gives you a straight grain in the front and back) and the little interesting detail of the different sized triangles whichs helps flare out the skirt in the bottom. (The small picture shows the different in length of back and front, which I decided to keep to give the skirt a little bit of a train)


The pattern gives you two non symmetrical triangular shapes  on the side of the dress

The hem

The wool I use is light weight, so I took the opportunity to try a technique a talented friend of mine used for her latest 16th German dress (Adelheit is one of my favorite choice to discuss 16th century sewing with, I warmly recommend to visit her newly started blog) which gives a bit extra stability …and also protects the hem and makes it look a little bit like I actually have an underskirt (California, you’re a very hot lady). Different ways to add extra stability and sturdiness can be seen in extant pieces, and with the information provided by Adelheit from her tries, I gave it a try;

  
1) The brown fabric is back stitched to the edge, then folded over a piece of double folded left over heavy weight wool fabric I happen to have in my scrap stash. Small running stitches keeps the inner layer of wool in place.

2) The orange fabric is then prickstitched on the front side to keep it flat and adding some extra weight

3) The brown fabric is then folded and stitched, which can be seen some from the outside 

4) I experimented with different kind of stitches; as a Campfollower, I probably wear the skirt hoisted, which would make the seam of the hem visible. I tried both wipstitch and running stitch but instead used a hidden running stitch (to the left) which is basically hiding the thread inside the fabric

The width of the brown fabric is simply decided by the fact that I use a light weight wool which makes the final stitches very visible, so I went for just about 1 1/2″, enough to give stability, but not too wide so I kept the front side stitches close to the hem.

The Skirt Guard

There isn’t that many 16th c Swiss dresses with a decorative guard on the skirt,  but since the dress is planned to be worn with out the fancy sleeves, I wanted to add something extra to cheer it up a bit …and also challenge myself to try to add a straight piece of fabric to a curved skirt.

  The original woodcut doesn’t show the full figure, which gave me some freedom to design the rest of the look on the dress, and I decided to use this guard design because it gave me the opportunity to add both brown and an additional yellow colour.

 The reason I choose to finish the hem before adding the guard was to make sure I had an even edge to work from when marking out the path of the guard (my Smocking ruler was very handy to use).
  

The top part is pinned and stitched first, since it’s the shortest length due to the cut of the skirt …the bottom part need some stretching before its pinned, and I wanted to be sure that the top wasn’t going to move. The yellow wool is simply double folded and slipped in between the lathe here, saving me some sewing time.

  
The bottom part is then steamed and pinned in order to follow the curve of the skirt

  
Before picture of the guard before its steamed and ironed flat. The construction of the skirt with the straight front and the flares on the sides, actually made this step easier then anticipated; I basically just need to start in the front and back and pin the guard against the sides until it started to crinkle, and then I steamed the fabric between this two points to form the guards to follow the curve of the skirt. 

The yellow fabric is slipped in before I start to sew;  

When you don’t want to pin all layers together (or pin on the ironing board as I did here since I was still using the iron to flatten the guards) you can always put something hard underneath to prevent the pin to go through to many layers (I used my ruler for example)  

…then all its left is to attach the skirt to the bodice, in this case I used evenly rolled pleats (woodcut number 3), attach the inner lining to the skirt and attach the sleeves and take a picture of the dress hangin on my dress form, until I can use it for the next event! 
Woodcut 1 and 4 is the same woodcut, and shows the inspiration for the neckline and the guards. 

Woodcut number 2 is the original I used as a base for this dress project with the fancy sleeves

Woodcut number 3 shows the inspiration of the pleating technique I used.

Update: I havn’t still got the time to take a clear picture, but some of my friends have at least managed to catch me in different angles during  this past weeks; 

  
Pictures taken by B. Rudmann

Slashed sleeves for a Landsknecht

IMG_1257.JPG
The picture above shows an intricate slashing of a wams, seen from behind, the sleeves has a very interesting shape with the same width from shoulder and down until it gathers around the wrist, creating an image of a pair of almost rectangular constructed sleeves.

The late 16th c pattern from Germany (also translated to English by C. Köhler in A History of Costumes), seems like a perfect shape to use to achieve the same look as the woodcut, including a very easy base to cut the long slashes. The even width of the slashes from shoulder to wrist is also a good inclination that the pattern is a good base to be used …and a picture of my re-calculation to fit my reproduction.

IMG_1254.JPG
The adjustments from the original pattern transformed into a full sleeve pattern.

IMG_1253.JPG
The fabric slashed in a similar pattern as the woodcut, including cutting it into three separate pieces. It’s hard to say exactly how many slashes the woodcut sleeve have, and I might have made a bit few, but I didn’t want to make the sleeve even larger until I get an idea how the pattern would work in real life; the sleeve still has to be both practical and elegant.

IMG_1250.JPG
Each slash is then hemmed, which of course isn’t a must, but the wearer was very specific of having an extraordinary flamboyant outfit, so I hemmed all slashes to make it look as neat as possible. The hemming is done with simple running and wip stitches, and all pieces is then ironed flat.

IMG_1258.JPG
Next step is to use the fabulous pinking tool and punch the crescent shaped slashes.

You can see on the woodcut that each sleeve piece has a slashed decor on the edge, which I simply make by ripping around 1″ wide fabric pieces, double fold them and then slash them an inch apart. The job of hemming this small slashes is way to time consuming, so I leave them as they are.

IMG_1255.JPG
Tip; ripping wool is an easy way to get long and perfect straight pieces of fabric, just cut around half an inch and rip. The technique works perfectly fine with silk fabric as well.

Each piece is sewn together and the slashed decoration is attached to each side
IMG_1283.JPG

Silk is a very nice fabric to work with, it’s light weight and more dirt resistant then linen, and only slightly more expensive. Silk also wrinkles less then linen, and the light weight of the fabric can be gather into incredible small areas, with out adding any particular bulkyness. It’s not unlikely to assume silk was used for garment used by Landsknechts, but it’s probably more likely used by officers, high payed soldiers or high class associates rather then the ordinary foot soldier. Linen fabric was probably much more common, or maybe it’s just your undershirt that is seen through the slashes since you can’t afford no other expenses.
When I calculate how much puffing I need I use at least length x 1,5 for silk, it gives the puffing a basic nice symmetrical look, this sleeves got a little extra length to give them even more flamboyant look. This sleeves is not to be lined, to keep them as cool as possible for the California summer by letting air in through the slashes, the silk is therefore sewed onto the sleeves close to the edge, the edges is then folded over and then just wipstitched, to preventing the silk fraying.

IMG_1347.JPG
IMG_1348.JPG

The pieces seems to be attached with cords, so each part is given four pair of holes on each side.

IMG_1334.JPG by making two holes next to each other, one cord is pulled through both holes on both pieces and can be easily tied on the same side of the fabric.

Each sleeve is hold together by 12 cords with aiglets
IMG_1395.JPG in a woodcut the cords is almost always seen tied with a single loop, and
On this specific woodcut, you can almost make out the loops holding the sleeve-pieces together.

IMG_1440.JPG Even though Urs Graf mostly painted Swiss soldiers, the garment is similar enough to be used for construction studies and Graf’s level of details and everyday poses provides us with valuable as well as the simple fact that the German Landsknechts also was inspired by the Swiss Reisläufers. The single loop cord is of course also seen in other German garment as in Albrecht Von Brandeburgens’s elaborated garment.

Each sleeves three pieces is attached to each other with the points

IMG_1504.JPG

And the full sleeve;

IMG_1506.JPG

IMG_1503.JPG

The full outfit can be seen here

Landsknechts outfits ready to be worn!

It’s been a crazy autumn with a ton of commissions to finish, here is at least pictures of the two first complete outfits. (I will try to get better pictures and more close ups at the next event)

Nicks outfit is completely handsewn and the Wams is my first try of making the ‘vest’ design with an attachable front piece. The puffs is white and black silk, and the wams it’s only lined on the torso to make it slightly cooler to wear in California.

IMG_1174-0.JPG you can see a little gap in the corner, an extra lacing hole will be added, along all around the edges between the hosen and wams, to prevent it from slipping from the weight of his weapon on his hips. Read more about his Wams here and his hosen here.

Dante wanted a very ‘clean’ designed Waffenrock , with just some slashes for decor. This kind of slashes is made by just cutting a diagonal slash and when attaching them I simply stretch the fabric slightly to open them up (read more about how to slash here).
The front is side closed with hooks and eyes, just along the inside of the slashed band. The placement of the hooks and eyes was placed there because I wanted the front decoration to be still visible even if he choose to unhook the top hooks due to the heat of California.

IMG_1171.JPG

The slashes before and after I attach them to the blue fabricIMG_1175.JPG

Markings for the vertical slashesIMG_0893.JPG

How the front opensIMG_1028.JPG

The hooks and eyes are all handmade, based on a 16th c Spanish finding

IMG_1176.JPG

The main design of the Waffenrock is inspired by the left picture, but instead of velvet and brocade I use wool fabric that Dante provided. The slashed decoration and the shorter sleeves is inspired from the two smaller woodcuts.

IMG_1184.JPG

Different ways to slash your 16th century German outfit

Handsewn slashes may look very neat, but all of us who have done it also know that it is a very time consuming sewing technique, and requires a great amount of patient when you slowly work your way through slash after slash. When doing commissions for others I’ve have therefore been working on different period solutions and alternative to keep the cost down for the costumer, and make my outfits available for a larger group.

The slashing techniques I use can be defined in three different categories;

1) Hemmed slashes
A technique very useful for light weight wool fabrics, velvet, brocade or other fabrics that fray easily. (read more about how I use the technique on wool here). It’s most commonly seen on Saxon dresses.

IMG_1143-0.JPG
A) “Herodias” by Lucas Cranach the Elder, 1530. The slashes seems to be stitched to prevent the fabric from fraying.
B) painting by Cranach. The shape of the slashes may inquire that it has been cut and the edges folded and stitched to the backside since brocade would be fraying to much to have just been cut open without any treatment.
C & D) paintings by Cranach. Another fabric can be seen along the outline of the fabric, indicated that each slash may be folded and the slashed seem is protected on the inside by lining with another larger piece of fabric, adding an extra decoration on the sleeve.

2) Straight cut slashes
The technique relies on the movement of the fabric to open up the slashes, some times padding is added to help

IMG_1129.JPG
A) Detail from Holbein’s Martyrdom of St. Sebastian. The detail shows a close up of the slashings and if you use a felted wool and slash it, the fabric would behave very similar to the painting.
B) Detail from Graf’s The Bearer of the Banner Canton Glarus. The sleeves is slashed and then the slashing is slashed as well, which gives you a straight cut profile that indicates no treatment has been made on the slashes
C) Aldegrever’s Portrait of Albrecht Von der Helle. A slashed decoration on a goller, which has probably a adding underneath the puff fabric to give a it a raised look as well as open up the slashing.

3) Cut or punched slashes
Pinking tool has been found in England, and is basically a shaped sharp piece of metal which you punch a hole with. The shape of the hole is based on the shape of your tool. If you don’t have a pinking tool available in the right shape, cutting out the slash with a small scissors is also an option to achieve the right kind of slash.

IMG_1149.JPG
A) Stoer, 1525-1530, Landsknecht Tailor
B) Breu the Elder, 1525-1530, Bastl Machenstreit/Profandmeister *
C) Breu the Elder, 1520-1530, Eberlein trit herein*
D) Schön, 1530, Landsknecht met Hellebaard*

IMG_1150.JPG

Slashed surviving examples of Landsknecht clothing has not yet been found, and the most common surviving examples of slashed clothing is made out of leather; an example of the three different techniques on leather

IMG_1135.JPG
A) Jerkin, England, 1550-1600. Pinked decoration in shape of stars, diamonds and hearts.
B) Doublet, England, 16th century. Cut slashes.
C) Painting of a Nobleman, Monogrammist GR (Germany) c. 1555. Slashed leather with possible metal thread decoration around the edges.

Which technique that is to be used may vary between where on the body of the garb I’m working on, what kind of material I’m using (light weight wool frays easier then felted wool, for example) and in some cases also on what type of status or trade the outfit is inspired from; a foot soldier or an officer or if they are a tailor or anything else.

What kind of technique used can’t always be determine by studying a woodcut or a painting, there isn’t enough details to study or the artist may have not consider that detail being important or sometimes you just can’t see if the slashing is cut or punched by a tool.

* woodcuts from Landsknecht Woodcuts; Kriegsvölker im Zeitalter der Landsknechte, G.A Johann, B. Enkevoerth, J. Von Falke

16th c Apron with Whitework Embroidery

It all started with me stumbling over an picture a friend posted on Facebook, she was hem stitching a veil, using Drawn Thread Work, and that made me suddenly realize this was the technique used on the collar of a 16th century shirt I was studying in a book. Four months later, after pinteresting and youtubing and asking friends, I decided to test it out on a bigger project.

The technique of removing a thread and stitch it into a pattern was used during the 16th century in a large area of Europe, though my research is focused on Italy, England, Sweden and Germany for various reasons.

The term whitework embroidery is a term used by L. Arthur to describe different techniques where you use white thread on white or natural coloured fabric, and since I haven’t yet figure out how to correctly translate the Swedish terminology of the different kind of techniques I’ve used, I decided to simply simplify it by using either Whitework Embroidery (vitbroderi) or Drawn Thread Work (utdragsöm). For those who may speak Swedish or want to google images and YouTube clip in a foreign language, you can also search for hopdragsöm, tränsad hålsöm, stolphålssöm, spindlar, snodd stolphålssöm and genombrutet broderi

The apron was chosen as simple enough start for me, and the repetitive pattern would give me hours of practicing to improve my sewing skills in the whitework embroidery genre …even though I handsew all my clothing, it’s still a different technique to do whitework embroidery that I needed to work on. And belive me, I’ve learned a lot on this project, some things I’ve managed to change to the better, some parts had to be left as they was due to my lack of skills …don’t get me wrong, I’m very very proud of what I managed to make, but I’m also very aware of the little mistakes that are in the final result, hopefully someone else will learn something from it, this is still the best I could have made with just, four months of experience;

The inspiration comes from a
German sampler (1618)

20140724-152047-55247533.jpg

A Swedish shirt (1567) with a simple Drawn Thread Work decoration

20140724-152114-55274903.jpg

…and then combine it by using the techniques on an apron, including the design, inspired from Italian surviving examples of aprons (late 16th c-early 17th c)

20140724-152119-55279919.jpg
…also found at the Metropolitan Museum

A small detail to add is that narrow white apron with decoration can also be found in Germany during the 16th c, which makes me wonder if they might have used drawn thread work for aprons as the Italian did. Does anyone have any idea maybe?

20140724-153602-56162494.jpg
Pictures found here and here.

I used a medium weight linen, and calculated the pattern by counting threads and then pull them carefully out of the fabric, saving all the threads so I would use them later when sewing (…my mother told me that this was how she was tought to do a traditional Drawn Thread Work when she was a kid, and I figure the same concept might been used during the 16th c. No need to waste good thread right?)

20140724-154319-56599063.jpg

…though using thread pulled out of the fabric was horrible 🙂 …one of three threads broke when waxing it, and wax was so well needed since the thread started to fuzz as soon as it was pulled out. I tried to use my normal linen thread at one part, even though it was delightful to work with, the colour was a horrible match; the thred was optic white and the fabric off white, which made the white thread shine brightly in the sun, so I hade to remove it and remake it with the fabric thread.

The technique of Drawn Thread Work is fairly simple; pull out the thread, stitch the sides. The pattern is depending on how many threads pulled out (I used 5 +20 pulled threads), then you start to stitch one row at the time;

20140724-155307-57187829.jpg
(There is a ton of good tutorials of how to get started on YouTube)

Where the rows met, I strengthen the threads by carefully wrapping the fabric threads.

20140724-155620-57380865.jpg

20140724-155740-57460764.jpg

I switch between sewing free hand, and using a frame; I padded the frame with a cloth to ensure that my fabric wouldn’t slack, and when working on the edges of the apron I simply used a thread to straighten the sides.

20140724-155956-57596374.jpg
(A bigger frame would probably made it easier, but I managed to use what I had at home 🙂

The squares where the rows met was filled in with a little web, that shaped the squares to a star

20140724-160335-57815198.jpg
The challenge with this procedure was to first get a long enough waxed thread without breaking it before you even started, and second to not brake it during the forming of the web; there isn’t much room to attach a new thread without bulbs…

The rows between the stars was needle weaved by again using a separate long double thread

20140724-160716-58036246.jpg

The long rows was of course a bit tricky to do, if I missed a spot, I had to undo evrything up to that point …and that happened a couple of times…

20140724-160936-58176792.jpg

The top part of the apron was attached by simply double fold a piece of fabric and whip stitched it to the apron; I pulled out a thread to make sure I stayed aligned when gathering the top part. The end of the ties got a small decorative tassel

20140724-161323-58403365.jpg

One of the features with the apron is that the hem stitch makes the apron reversible;

20140724-161504-58504611.jpg

The finished apron took around 3-4 weeks to complete.

20140724-161535-58535960.jpg

…the one thing I didn’t anticipate was that the wax on the thread would stay after washing it, so ironical the stars are now darker then the rest. Hopefully will it change after being washed a couple of more times

20140724-161736-58656874.jpg

Book sources;
Arnold, J, Patterns of Fashion 4
Arthur, L Bonniers Stora Bok om Broderi
Nylén, A-M Livrustkammaren, vol. 8-9; Stureskjortorna

http://realmofvenus.renaissanceitaly.net/workbox/extapr.htm

I had a great deal of help from my mother who’s own interest in handcrafting provides me with tips and tricks of how to continue on my own path; Her knowledge and skill have been invaluable, without her, I wouldn’t have been able to get this far …thank you so much, Lotta! ❤

16th c Drawn Thread Work

I’ve started a new project, to recreated a 16th c shirt, and the specific shirt happen to have a small beautiful decoration around the collar. So, why not learn a new technique?

Original shirt (part of collar) top and my reproduction (bottom);

20140220-122624.jpg
Width 1 cm (from black to black)

Since the technique is intriguing I just had to use it on other pieces;
20140220-122904.jpg
Hemming with 1 thread removed

20140220-123015.jpg
Testing the technique with 20 threads removed, and without a thread drawn through

20140220-131540.jpg
With the drawn through thread in the middle

Sources:
Nylén, A, The Royal Armoury, Stockholm, vol IV 8-9

The Trossfrau sock

UPDATE: read about  my latest type of socks here

Several pictures shows the trossfrau wearing some sort of socks, and I’m currently working on figuring out the two different common styles

20140113-172647.jpg
Would be nice to wear during summer instead of full length hosen, or if I make it out of wool, a nice addition to colder nights.

Update; Since several people have asked about the pattern and how to make them, I’ll give you some instruction of how to get started!
I started the project with the hypophysis that the socks is made out of either cut off hosen or at least based on the same pattern. There is several different nice tutorial of how to make a pair of hosen out on the internet, but making a pair out of fabric requires some extra pair of hand, and you don’t always have a friend around to help you, so I suggest the Duct Tape Toille;

1) cover your foot with a sock (or fabric or a plastic wrap; it’s for not getting an unwanted hair wax from the duct tape)
2) tape your foot with Duct Tape, not to thick layer and be sure to not crimp your toes
3-5) draw the cutting lines; since I base mine on a pair of ordinary hosen, I have the mid back seam that goes underneath the heal, and then a foot piece with “wings”. This gives you a fitted hosen pattern.
6) cut the duct tape by the mid back seam so you can remove it from your foot, then cut the rest of the lines
7-8) your pieces should look something like this, if you can’t flatten the larger piece, then you need to adjust the “wings” a bit
9) transfer the pieces to a new paper and adjust and clean the lines
20140114-155045.jpg

When your base is finished, you can start remodeling the edge of the hose depending on which woodcut or painting you feel to duplicate;
20140114-161923.jpg

Update;
After working with the pattern for a couple of days, I’m satisfied with the result of sock A;

20140115-104056.jpg

The pattern ended up being cut into smaller pieces, which will make the assembly much easier.

20140115-105446.jpg

The finished pair of socks

20140208-100832.jpg

Update; the linen socks was great, but the wool ones are awesome! Soft, and incredible comfortable, just like the linen ones, these protects your shoes from filling up with a great deal of sand, stones etc, and provides a nice soft soles.

20140617-165753-61073251.jpg

I also found an interesting site with a different angle of how to recreate the footsies, read and broaden your view; raised heel shoe

Update;

A friend, Lady Petronilla of London managed to find some exclusive photos of an extant example of linen inner shoes from the 15th c, I now look forward to study them further and adjust my pattern to the new information given. She has also promised to see if she can get even better pictures of the different sides of the shoes, until then, here is what I have;

2015/01/img_1754.jpg

2015/01/img_1753.jpg

2015/01/img_1755.jpg

2015/01/img_1756.jpg

2015/01/img_1757.jpg

2015/01/img_1758.jpg

2015/01/img_1759.jpg

Checkered Landsknecht Hosen

Update: a common problem after one have finish those hosen, is that the waistline increases due to wear and tear unless you add a piece of extra straight cut strip of linen between the layers around the waistline, which will keep the shape and size of your pants when you wear them. The strip of linen doesn´t have to be more complicated than you cut on the grain a 5 cm/2 inch wide piece and add it. Or, if you prefer the easier way, to just get pre cut stuff direct from Amazon <a target=”_blank” href=”https://www.amazon.com/gp/product/B00IAXVZVM/ref=as_li_tl?ie=UTF8&camp=1789&creative=9325&creativeASIN=B00IAXVZVM&linkCode=as2&tag=whiiljascorne-20&linkId=23b0daa5e4a84d5a59959d3167cad4fe”>Linen Fabric Ribbon with Fringe Edge 2″ Wide x 5 yds.</a><img src=”//ir-na.amazon-adsystem.com/e/ir?t=whiiljascorne-20&l=am2&o=1&a=B00IAXVZVM” width=”1″ height=”1″ border=”0″ alt=”” style=”border:none !important; margin:0px !important;” />

The finished outfit:
2015/01/img_1174.jpg
———–

20131208-150911.jpg

The hosen is based of Ulrich Tengler’s ‘Laienspiegel’, Mainz, 1518, and the amazing outfit a friend made a few years ago;
20140801-152155-55315659.jpg

Cut out 2 pieces of the leg in the colours of your choice and draw opposite lines on each leg in an angle.

20131208-144711.jpg

Note that the lines doesn’t goes all the way to the crotch; it will be more comfortable with less fabric between the legs and it will be easier to do the lacing holes for the codpiece if it isn’t to thick layers of wool to sew through. As you can see, the back mid piece doesn’t have any lines, that part is going to stay single colour.

Braid the legs to each other

20131208-144956.jpg

20131208-145007.jpg

Pin the pieces and use basting stitches along the sides to keep them from not moving while sewing.

20131208-145407.jpg
And cut off the extra fabric, giving you just a single layer all around the outer seams.

When cutting the pattern, be sure think over the cutting pattern twice… And don’t cut to much, or you need to start over …or repair it;

20131208-145704.jpg luckily this part is in the crotch and is going to be hidden by the cod piece (never waste fabric!)

Front and back;

20131208-150130.jpg

20131208-150147.jpg

Te other leg is based on another woodcut (Peter Flötner, the Landsknecht) and is long (to the knee);

20131208-151448.jpg

The “figuring out the pattern”-part is sometimes a bit tricky;

20131208-151703.jpg …and I’m not sure if the cutting will actually make it “fall” as the woodcut shows, or if I have to cut it differently. So I decided to keep it like this and cut it out as a tryout. You can also see that I have simplified the pattern at the upper part of the leg, since I don’t want to ruin the fabric by guessing it wrong (It seems like the leg has a striped hosen underneath, but I’m going to keep that part single coloured this time).

Different kind of solution for the pattern;

20131209-135039.jpg

The leg has been slashed and I’m now working on finishing the edges by hand.

20131211-110046.jpg

Most of the slashes is now finished and you can see the complete pattern;

20140108-141834.jpg

The leg still need to be pressed by iron an there is still some areas that need more slashing. Here I’m adding additional flowers;

20140108-142017.jpg

The slashed leg gets a white wool lining, same basic hosen.

20140108-191723.jpg
As you notice I finish the seam from the rigth side, the purpose of finishing is mainly to keep the seam flat since this kind of wool rarely fray and the hosen is going to have a linen lining anyway so the seam will be well protected from any stress.

Due to circumstances (I managed to make two left legs, okey?) I decided to make a pair of hot pants and another pair of longer ones. So the checkered leg is going to be paired with
a slashed short leg based on the left woodcut, with decoration inspired from the right woodcut;

20140109-135231.jpg

I cut out a short leg (around 10 cm below the but) and slashed it vertical (as the woodcut shows) and stitched the slashes on the backside to give the edges a smooth and proper look. I haven’t cut out the little flaps on the bottom yet, since I want to wait until I can try them on the person one more time, and make sure that the pants is the proper size.20140109-135611.jpg You can see different kind of pattern I’ve sketched on the backside, trying to decide which to use for the leg. It was my husbands idea to actually use hearts, and since it is hot pants, with one checkered leg, why not go with the gambling theme and make hearts and spades, divided by diamonds? The shapes can be found on the woodcut above, a piece of fantastic garb that I would love to make in a future, until then, I will be inspired by the design and idea to use on my friends hot pants.

I usually use a template to be sure that the pattern is even, then just draw, cut and repeat.

20140111-163100.jpg

The spades are upside-down hearts where I cut a small triangle in the angle and the cut of some of the little “arms”.

20140111-163424.jpg

20140111-163521.jpg
The right leg with hearts, spades and diamonds.

Adding the white wool lining, note that I try to keep the thickness down a bit by simply stick it underneath the folded seam.

20140111-163738.jpg

20140111-163747.jpg

The I attach the two legs to each other (yay they fit!), and cut out the natural linen lining on the bias (for stretch); they didn’t dye linen and a white linen would become dirtier faster then a natural. A natural linen would also be cheaper, and is therefore a perfectly period choice for a pair of Landsknechts hosen.

20140111-164545.jpg to be sure I would end up with one left and one right leg, I carefully marked each leg with a big x, before I moved the fabric and started sewing.

20140111-164902.jpg the seams are regular running stitch (with occasional back stitch), note on the left pic that the seam isn’t as narrow as a machine stitch; handsewing a garment actually give the seams a bit more movement and the seams can take a bit more stress before they brake. When finishing (right pic) I choose to just fold it (as I do with wool) and stitch it down. The linen is protected from fraying by the wool lining and just folding it once reduce bulgy seams on the back.

20140111-165426.jpg
The excellent linen thread for handsewing is Bockens Knyppelgarn, and even though it is available in several different colours, I rarely use anything else besides black, white and natural linen thread size 35/2 or 60/3 (it’s kind of same thickness).

20140111-165917.jpg
Then attach the linen lining to the wool pants, start mid back and pin (since bias cut has a tendency to stretch) and sew, repeat on the other side.

I need to do one last fitting, to see where to start the codpiece, and to make sure that the hosen are fitted nicely around the waistline, so I only attach the linen and wool around the waistline and down mid front straight section.

Update; the first part of the hosen are finished, here is a picture of him wearing them at the local Renaissance fair

20140717-163937-59977086.jpg

Update; the pants is fitted with the extra piece of leg and the socks

20140728-161929-58769614.jpg

Schlappe, Kappe, Coif, Armoring Cap

A sneak peek on one of my several projects; decoding a pattern for the German cap. I’ve found 3 different kinds so far;

1)

20131127-185813.jpg

2)

20131127-190114.jpg

3)

20131127-190255.jpg

The patterns is probably something like this;

20131127-190603.jpg

Step one; figuring out the proportions for the hat by using an old pattern for another kind of German hat

20131127-191132.jpg

20131127-191301.jpg

Need to make some adjustments of the top (to big, to square) and make the backside a bit wider.

Back to the drawing table!

Update;
Maybe the pattern for alt 2 is like this;

20131127-194800.jpg
That would save some fabric, sewing and would be faster to make?

The idea worked out pretty good

20131128-104312.jpg
And I found the same concept at Tece de Kaxtone’s blog (if you want some more inspiration for hats).